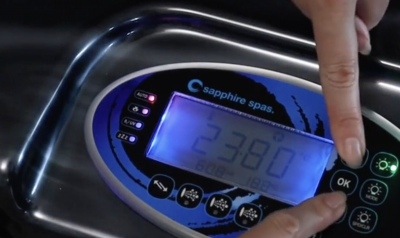
mySpa@Home SUPPORT : we're here for you

As part of the Sapphire Family we’re here to guide you every step of the way as you enjoy your new spa at home

As you watch the videos below, remember you're protected by our lifecare commitment; just contact the team at your local Sapphire Spa store

set up & ENJOY your new spa

These videos, links and information run you through the initial start up (handover) process for the first time you use your new spa / swim spa at home and support you along the way if you need to ask some questions. You can also refer back to this information as we offer our lifecare committment.

Find all our product manuals in our online library.

Your first spa use

INITIAL SET UP : everything you need to know when you get your spa delivered


Before we begin, please ensure that your spas power supply has been installed and connected by a licensed electrician to ensure the safety of everybody using it.

Carefully unwrap your spa and check over the surface. If you notice any transit damage to your product, please photograph the damage and contact the retailer that you purchased the spa through.

Now it’s time to fill your spa. Make sure you read the instructions in your owner’s manual and fill the spa by removing the filter cartridges and placing the hose inside the skimmer box, instead of the foot well. This just ensures the pipework underneath the spa is full of water first, reducing the chance of you getting an airlock in the pumps. Ensure your spa is filled to the correct water level, which is half way up the skimmer box.

You can find a copy of our Owner’s Manual and tips on filling your spa on this page

Ensure all air controls on the topside of your spa are turned to the ‘off’ position. Failure to turn off the air controls will extend your heat up time dramatically. Once the spa is filled to the correct level, turn the power on to the spa; the touchscreen will light up and the spa will begin its PRIMING sequence. This can take a few minutes but, once complete, the screen will default to its standard display showing your current water temperature. This means the priming has been successful and you can move onto the next step.

If however, an error message appears or you can hear the pump attempting to power the jets but there's no action inside the spa, you may have an airlock that needs to be released. CLICK + to open 'Oops, jets won't work?' section just below for help with this.

If your spa is fitted with an iTouch colour screen display touchpad, press the settings/cog icon bottom left and you’ll find all the same settings we’re about to run through here today.

Setting the TIME

The first thing we need to do it set the TIME. This is very important, as your sleep and filtrations cycles will run off this clock. Use the up arrow to toggle through the WATER TEMP / SET TEMP / TIME menu and press ok when you see TIME. Go through setting the date and time for your spa and once complete the default display will appear back across the screen.


Setting the water temperature S.TMP

Now were going to jump back into the menu and set the water temperature which can be done by pressing the up arrow, selecting ‘OK’ when you get to S.TMP. Use the arrows to set your desired temperature and hit OK. The current water temperature will appear on the main screen area and your set temperature will appear below in smaller text. CHANGING TEMPERATURE UNITS FROM F (farenheit) to C (celcius) - press and Hold Air Blower & Clean Button together until C.LMT comes up - scroll until you reach - UNIT press OK, press OK and change from deg F to deg C


Choose the MODE to suit your lifestyle

You can enter into the more advanced menu by holding the UP & DOWN arrows at the same time until MODE appears on your screen. 

MODE allows you to select from three different operating modes of the SV controller to suit your lifestyle. You can enter into the more advanced menu by holding the up and down arrows at the same time until MODE appears on the screen.

The first is ‘NORM’ or ‘Normal’ mode which operates normal demand heating and filtration for your spa. If you have your spa at home and are using it regularly then this is the one for you.

Secondly we have AWAY mode. This mode disables the heater and will only run your filtration for one hour per day to keep your water circulating with minimal energy costs. If you are on holidays or don’t plan to use your spa for a period of time, this mode will keep running costs low without needing to empty the spa.

Finally we have WEEK mode. From Monday through to Thursday, the spa will operate as it would in AWAY mode, but then from Friday to Sunday the spa will resume normal operation. If you find that you are only using your spa on the weekends, then this mode will be ideal.


Set snooze timer : SNZE

The next setting is SNOOZE which will put your spa into sleep mode so it doesn’t operate during your chosen hours. Out of factory, the sleep time will begin at 10pm and the spa will wake at 7am – seven days a week. You can use the OK button to go through and set these options and customise the sleep hours & days to suit you best.

There is also a second SNOOZE timer so you can set different hours for weekdays and weekends.


Set the filtration cycle FILT / F.CYC

Firstly we have FILT which determines the total amount of hours your spa will filter for per day. For spas, we recommend 6 hours and for swim spas we recommend 8.

Next we run through F.CYC which is your filtration cycle. This just breaks up the total number of filtration hours into blocks throughout the day. We recommend setting this to 3 hours which will allow the spa to run a filtration cycle every 3 hours and top up any heat loss at the same time to reduce energy consumption.


Use timeout T.OUT

Time out, or T.OUT is a setting that will turn off your spa pumps after the time out period has elapsed. This is just in case you leave your spa and forget to turn off the jets, defaulting your spa back into automatic mode. Our factory setting is 30 minutes, but this can be customised anywhere from 10 minutes to 1 hour.


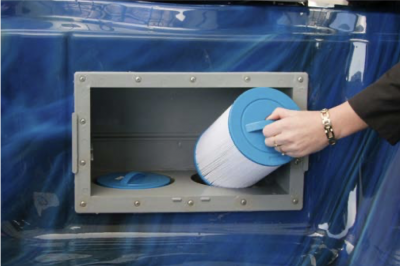
Use water clean W.CLN

You spa will run through an automatic daily water clean cycle which will time itself out after 10 minutes and resume normal operation. This is an important function to flush the spas pipework and ensure the water is passed through your filter cartridges to remove any contaminates. Our W.CLN setting allows you to choose the time that this cycle takes place, but it’s default time is 9am. 


Add your chemicals

Now that we have configured all of your settings, it’s time to add your spa chemicals. Please follow the instructions from your local Sapphire Spa retailer for a detailed water maintenance schedule and start up chemical kit.

It is very important to ensure your water clean function is activated when adding chemicals so they don’t sit on the bottom of the spa acrylic. Pressing the water clean button will begin the cycle and help your chemicals dissolve. It’s also a good idea to wait 30 minutes before placing your cover on the spa after adding chemicals.


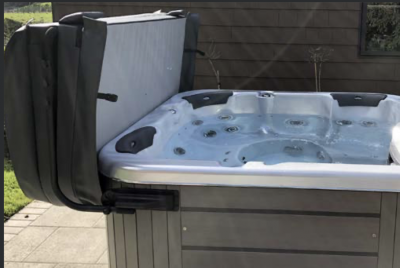
Initial spa heat up & first use

With your water temperature set and chemicals added its time to let the spa begin its initial heat up. Place your hardcover on top of the spa to help insulate and retain the heat which will result in a faster heat up time. Once your spa has reached your desired temperature it’s time to hop in and enjoy.

OPERATING THE TOUCHPAD : Your touchpad will have several different buttons to operate the massage jets, air jets and lights, so let’s go through how to operate these now.

FILTRATION PUMP : filtration pump button operates your filtration pump which looks after your spas heating and filtration. Every press of this button will change the pump from ON, OFF, AUTO. It is recommended to always leave this on AUTO so the spa can heat and filter when required. If the pump is turned to off, it will default back to auto mode after 30 minutes.

BOOST PUMPS : The next buttons along the touchpad are your boost pumps which will turn the massage jets on and off in your spa. Depending on the model you have purchased, you may have up to 3 of these in your spa, or up to 4 in a swim spa. These simply operate with one press of the button to gets the jets to fire up and another press to turn them off again.

AIR MASSAGE JETS / BLOWER : The air jets in your spa are operated by the blower. This can be turned on by pressing blower button and you will have the option of choosing VARI mode to pick your massage pressure or RAMP mode for a gradual increase and decrease in massage pressure.

LED SPA LIGHTING : Our LED Lighting has several different options to suit your mood. To turn the lights on, simply press the light button for an ON/OFF function. You can flick through the different options to choose from single colour, white, fade, step and party modes. The colour brightness and transition speed are also adjustable here.

WATER CLEAN : The water clean button runs our water clean function which is this is the same button that we used when we added our chemicals earlier. This button needs to be pressed once you have finished your spa session and will begin a 20 minute clean cycle which will again time itself out and resume normal operation once completed. This function helps removes any contaminates, such as sunscreens or make up, brought in by bathers to help maintain high water quality.

TOPSIDE CONTROLS : Your Sapphire Spa also has three types of topside controls. The smallest being our ON/OFF dial. These dials manage all water features such as waterfalls or water spouts, as well and neck & shoulder jets. Turning these dials will result in these jets simply turning on or off.

AIR CONTROLS : Next we have our air controls which will control the strength of the jet stream from each massage chair. Turning these into the ON position will increase the massage pressure or decrease it when turned towards the OFF position. It's also worth noting that each individual jet face can be opened or closed simply by rotating it.

TOPSIDE DIVERTORS : Lastly, our largest of all topside controls is the diverter. Spas that are fitted with diverters give you the ability to divert water pressure from one area of the spa to the other. This could be from one reclining seat to the other or from one bank of jets to the next.

Oops, jets won't work?

Do you hear the pump attempting to power jets, but no action inside the spa?

You will simply need to bleed / prime your pump to release any airlock that filling your spa has created.

During initial start up, your spa may experience an airlock (you can hear pump attempting to power jets, but no action inside the spa) so pumps will need priming/bleeding. These quick videos will assist you through the simple procedure of releasing the air lock.

Priming/Bleeding to release airlock : POST2020 Smartflo BLUE PUMPS


Priming to release airlock : pre2020 BLACK PUMPS


Here we run through the troubleshooting steps you can try yourself to bleed the air from your spa pumps to remove an airlock. If you need any further assistance, please give our Melbourne service department a call from 9am to 5pm Monday to Friday or your local Sapphire Spas retailer.

If you turn your spa on & the touchpad gives you an error message, it will be the filtration pump that needs attention, so let me show you how to do that now. If your priming is complete, & you turn on one of the massage pumps but no water comes out of the jets, you will have an airlock in the boost pump. This pump is easier to bleed and I’ll show you that next.

For safety purposes I’ll get you to turn off the main power supply to your spa. Then you can release the all cabinet doors by undoing the screws with the allen key supplied with your spa. Lift out the cabinet doors to give you access to the workings of you spa. Let’s take a look at the componentry under the cabinet. This is what your filtration pump will look like; it’s the smallest out of all your pumps. This is what the boost pump looks like, you can see it’s bigger compared to the filtration pump.

The blower, which supplies air to the air injectors that are usually placed along the bottom of the seated areas. This is the control box which is usually located in the cabinet door that’s directly under the touch pad. This is a typical set up for a spa pool, the only difference is some have one boost pump and other larger spas have multiple larger boost pumps.

If you have a swim spa, you’re best to open the cabinet door which is under the seated area, as we need to install your equipment where we can find some space.

Locate the filtration pump first. As I mentioned earlier, if you’ve got an error message on your touchpad, it will be the filtration pump that needs attention. On the left side of the pump, this is where to find the release valve. Open the release valve to about half way but be careful not to completely remove it. You should hear the air purging out and when you see water coming from the valve, the air has been released. You can then proceed to tighten the valve clockwise.

If the valve on your spa is not easy to access, loosen the barrel union on the right angle of the spa pump instead. This can be done using a screwdriver and hammer or monkey grip pliers as we can see being done now. When water is seen coming from the pipe, this shows that the air has been released. You can then proceed to tighten the barrel union. Your spa is now ready and these troubleshooting steps should’ve rectified the air lock error. Replace the cabinet doors and turn your spa back on to enjoy.

If, when you initially turn you spa on, the priming sequence successfully completes but, when you turn on one of the massage pumps, no water comes out of the jets, you will have an airlock in the boost pump. This pump is easier to bleed and I’ll show you that now. Remove all the cabinet doors in the same way and locate the larger boost pump. This boost pump has the same blue bleed valves and we are going to follow the same process using the top lug. Turn valve, release air, wait for water to dribble out, tighten back up, turn pump on at touchpad and jets will fire up. Keep note you may have more than one boost pump in your spa.

Touchpad Control : Quick Reference Guides

You may also find it useful to download the appropriate ‘quick reference guide’ for your spa (if you are not sure which POWERsmart control system your spa has installed, simply open the side door of your cabinet and note the SV number on the label on the black control box.

SV2 Quick Reference Guide (1.8 MB)

SV3 Quick Reference Guide (1.8 MB)

SV4 Quick Reference Guide (1.8 MB)

Pump Operation : hydrojet & varidrive80 pumps

A detailed run through showing how to operate the hydrojet & varidrive80 water pumps within your spa (these pumps are responsible for running filtration and water jets within your spa)

Heat&Cool pump operation

Once connected, the SV controller will automatically detect the heat pump and enable its operation. Operation and use of the heat&cool pump is covered in a dedicated section of the manual provided

Spanet SV Series HEAT PUMP Manual (1.2 MB)


Advanced touchpad control usage

This video takes you through the advanced settings in more detail of your topside touchpad control.

Advanced touchpad control usage


Air blower operation

A detailed run through showing how to operate the blower pump within your spa (this pump operates the air jets that are typically positiioned just under your knees on the top/front of each spa seat.


Air blower operation


SPA MAINTENANCE : drain & clean your spa

Your Sapphire Spa will require some maintenance every now and then. This involves removing your filter cartridges at least once a fortnight, depending on use, by removing them from your spa and hosing them down to remove debris or even soaking them in a filter cartridge cleaner. Your filters will need to be replaced every 12-18 months depending on use.

It is recommended to drain one third of your spa water every three months to refresh your system and maintain good, clean water again, but a full drain every 6 months or sooner if necessary. This will be determined by which sanitisation system your spa is fitted with and how often the spa is used. A water test from your local pool & spa store will tell you when its time to drain based on the total number of dissolved solids in the water which can make it difficult to maintain balance of the water and hamper the sanitiser effectiveness.

In order to drain your SPA POOL you will need to locate your drain valve / for myHotTub & SWIM SPAS a drain hose will be found within the cabinet so you will need to remove the appropriate cabinet door to access (remove screws with allen key provided & lift door then pull outwards at the base). Position of the drain hose can be found on the appropriate spa model website page, where you can 'DOWNLOAD TECH SHEET for equipment placement' at the bottom of the Products Specifications table.


Draining your spa

For a more detailed guide, refer to our 'Tips & Tricks on 'Draining your spa'

Owners Mauals
×